Wednesday, February 19, 2014

Sun Kissed (dedicated to Randi Ann, my boo)


This is dedicated to my friend Randi Ann (my boo) who is going to the beach in California (only a little jealous) and needed some ideas for beach makeup! So I have created Sun Kissed and hope that you love it Randi Ann! And for those of you that see this and you follow me on facebook, you know that I have never actually gone to makeup school and all of the looks I create are from me seeing something I like and working over and over again until I can duplicate it with my own easier, not as technical, methods. So I do not know how to contour but I think the way I will use my bronzer in this one is similar. Either way, it's still a pretty look and I hope everyone loves it!

First, have a clean face. It's paramount. Putting new makup on top of old makeup leads to so much bacteria and then you get pimples. (and yes, I try to scare women out of starting with old makeup because it really is bad for your skin!!)

First, apply your foundation like normal if you use it. If you do not, that is okay, but I highly encourage you too. There are so many benefits of using foundation such as evening your skin surface, evening out your skin tone, and if you are someone that has red skin on your face, it is better for you skin than using several different powders because they can clog your pores so badly and quickly.

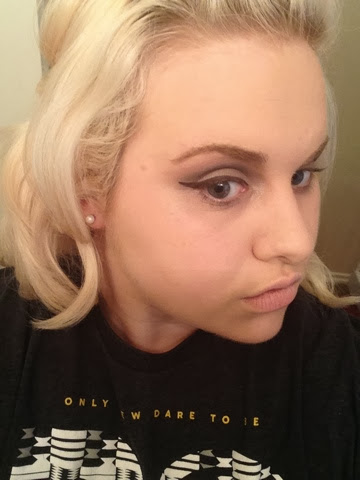
Next, as I said earlier, I have never gone to makeup school so this next step is going to be my "contouring." I would say that a bronzer would work, I am going to use the dark bronze and tan pallets (upper and lower far left). 

So what I did to get my "glow" in this frame is I took a blush brush and I applied the bronze and tan pallets in these areas (some are harder to see because of the lighting, I apologize):
1) both sides of my forhead but not the middle aread
2) my cheeck bones
3) along my jaw bone
4) my nose 
5) my chin

Next comes powder. Make this the lightest layer of powder you have ever put on in your entire life! That is what I had to do haha! Very light powder because too much will completely cover up the bronzer.

Next I used my actual bronze colored blush and went over my cheeks as if I were putting on my blush normally.

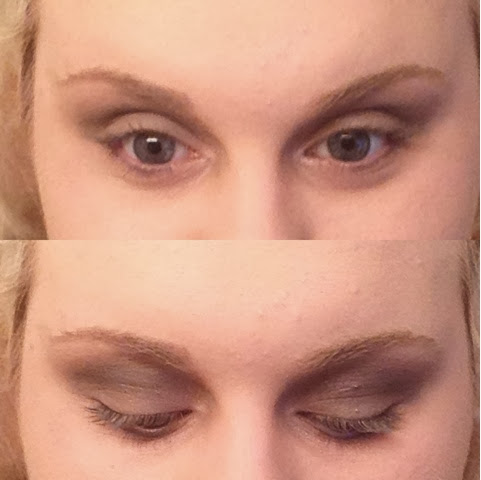
These are the 3 colors I am going to use on my eyes. 

So first things first, I used the vanilla colored shadow as my base and applied it to my upper and lower eyelids. 

Step 2: I used the shimmery pink shadow and applied it only to my upper eyelid. Not to the area directly under my eyebrow.

Step 3: your crease of course! I used the darkest shadow on my pallet and made a light crease (I did not apply a lot of the dark shadow, just a light layer of it).

Step 4: using the darket shadow, I used a smaller eyeshadow brush to apply the darkst shadow to my bottom eyelid. 

Step 5: using your darkest shadow still, use and angled eyeshadow brush and apply the shadow to the lash line of your top eyelid as if you were putting on eyeliner. This step is simply to create an area between your mascara and your eyelid itself. 

Next comes your bottom mascara. I always apply it first because I do not like having a bunch of little dots on my upper eyelid from looking up to put on my bottom mascara.

Then comes your top mascara!

Add some pink lipgloss and your Sun Kissed look is complete!!

** In this tutorial I simply brushed my eyebrows. Because we are going for a light beachy look, we do not want our eyebrows to be bold and not blend in with our over all look! 

XOXO Lala 


Fast Class

So as many of you all know, I am a full time student, makup blogger, and animal advocate. Therefore, I have a lot on my plate. I also know almost everybody else in this world is busy with their own things as well so getting ready in the morning and looking presentable has to be done while you're on a time crunch. So when getting ready for school and running out the door, when I do wear makekup to school, it has to be something fast and simple. So this is fast class :) (I also have a Work Day makeup tutorial that is quick as well!)

Always start with a clean face. Left over makeup is terrible for your skin!

Foundation. I love foundation because it evens your skins surface and provides an even skintone.

Next comes your powder. I always apply mine in a circluar motion to make sure that I cover my entire face and then I run my brush down my neck to blend my makeup line on my jaw so that people wont laugh at me (or you when you put on makeup) later. 

So in this frame, I have simply brushed my eyebrows. Because we are doing our makeup quickly and keeping it light, we don't want heavy eyebrows because they will stick out like a green thumb. As I have said in my other tutorials, eyebrows bring a look together or tear it apart.

Your eyemakeup. Well, because we slept through our alarm and only have 15 minutes to put on makeup, we skip everything because we are in a hurry and only do our crease so that our eyes have some depth.

Next comes your bottom mascara. As I have said before, I always do my bottom mascara first so that I do not have a lot of little dots from my upper mascara touching my upper eyelid while putting on bottom mascara.

Then of course there is the top mascara. I try to keep it light because you dont want them to be over powering. Your goal is to have a balanced look.

Next comes blush. I used bronze because it is a great color and it blends well with the overall look we are creating.

Finally, add some pink lips and you're ready to change your sweat pants and walk out of the door!

And yes, this is me most mornings sadly haha! Now my secret is out...


Date Night Glam!

Every time a girl is going to go on a date, the questions always come up: What am I going to wear and how am I going to do my makeup? Well I do not know everyones date night style but this is my idea of a date night look, I hope you enjoy!

Always begin to apply your makeup on a clean face. Those pores do not like to get clogged! 

Foundation. Not everyone wears it but I encourage it because it evens out your skin tone and lets you have an even surface to put makeup on. Be sure to cover your lips in foundation too because sometimes dark colors of lipsticks and lipglosses travel up the lines in your lips and foundation helps to lock your lipstick or lipgloss into place. Powder also has the same affect. 

Powder. I love powder and I apply it in circles to make sure that I get full coverage. It locks everything in. Also when putting on your powder, don't forget to put it on your neck as well! You don't want people looking at your neck and being able to see where your makeup starts!

Eyes: For your eyes you will need 3 colors. I have a nude, a salmon pink, and a shimmery dark brown. 
Step 1: Use your nude shadow for your base. Apply it to your upper and lower lids. 

Step 2: using your pink color, apply it to the upper lid only, not by the eyebrows. 

Step 3: using your dark brown, create your crease. Also, using a smaller brush, use the same brown on your bottom lid to give it some depth.

Step 4: using your nude base shadow and a brush, begin to blend your crease up into the area by your eyebrow. It blends your crease so that there are no harsh shadow lines but also it puts more base color up top so that your crease does not take over the part of your lid by your eyebrow.

Step 5: Fill in your eyebrows! Your eyebrows are so important because they bring a look together, or they are the piece that is missing. Ever look at a picture and notice the face is off a little? Next time you do, look and see if the eyebrows are filled in, 9 times out of 10, that's why!

Step 6: Create your cat eye! (The Cat Eye tutorial is posted!!)

Step 7: I used a navy/aqua blue eyeliner pencil, but you can use any color you'd like on this part because this is where I like to add just a pop of color by applying eyeliner to my waterline.

Step 8: apply your bottom mascara. The number 1 rule I live by when it comes to applying mascara is always put the bottom on first. If you put it on your top lashes first, that is just fine. But if you use wet mascara and don't wait a couple of seconds for it to dry, you will have tiny dots under your eyebrow because you look up to put on bottom mascara but you are looking straight ahead when you apply top mascara so you don't have all of the little dots.

Step 9: apply your top mascara! Be sure not to put too much on though because we are going to put on dark lips and you don't want your mascara to be too dark and overtake your lips.

Blush. For this look I used Nars Exhibit A red blush because when toned down it's very pretty. The great thing about blush though is that if you ever put too much on like I did in this picture, you can simply apply more powder to tone your blush intensity down. 

Here I have applied more powder to my cheeks to tone down the red blush.

Now, apply a dark red or dark purple lipstick or lipgloss and your look will be complete. I love the dark lips with these eyes over a nude lip in this case because we used pinks and browns, not nudes and browns. Also, I think the dark lips go well with the red blush!

:) Thank you!


The Cat Eye

There is one thing since the beginning of makeup that all women try to perfect: the cat eye eyeliner. Well, even though I for sure have not perfected it, I sure have created an easy way to make one! :) 
In this tutorial you will see how I create my cat eyes and these steps can be manipulated however you would like size wise to create a bigger, smaller, fatter, skinnier, or whatever you want cat eye.

Step 1: You can use any kind of eyeliner, I just prefer liquid eyeliner, draw a thin line along your lash line. Mine isn't perfect and yours donesn't have to be either. In the second to last step we will straighten the line.

Step 2: draw a single line out as far as you want your cat eye to reach from the middle of your outer eye where your top and bottom lids come together.

Step 3: draw a line connecting the tip of the line we just drew to the thin line on your lid just above your eyelashes. IT WILL NOT BE STRAIGHT OR PERFECT. 

Step 4: fill that area in we just created with your pencil or your liquid eyeliner. 

Step 5: being careful not to make your cat eye too thick, run your wand or pencil over the top of the cat eye to smooth out the unevenness to make your line over all line flow (if you have a sharp corner like I do in the picture above, you just want to round it out to not make it look choppy).

Step 6: Look at yourself and be proud! You just made a cat eye! 

If you have any questions, those that have my number text me! If you do not, my email is listed in my bio! 

XOXO Lala